One of the most frequently asked questions I receive about seed starting is, “When should you start tomato seeds indoors?” Let’s take a look at tomatoes and how to start them from seeds.
If you plant to grow just a few tomato plants in containers or pots on your balcony or desk, you are better off purchasing plants from your local garden center or nursery. You will get better results and save money and time. If, however, you wish to plant many varieties of tomatoes in a large garden, then starting from seed is the most economical approach.
Starting Tomato Plants from Seeds
Tomato plants can be grown from cuttings or from seeds. You can also purchase plants in pots or containers and transplant them into your garden.
Most tomato lovers grow tomato plants from seeds. Seeds provide you with an enormous selection of tomatoes. You can choose heirloom or hybrid tomatoes, cherry tomatoes or giant beefsteak tomatoes, or colorful red, purple, yellow, striped, and even green tomatoes.
Garden centers are limited by space and general local demand to a select few varieties of tomatoes to grow or purchase for resale. The gardener who begins tomato plants from seeds is not limited by either. He or she can choose any seed to start indoors.
Growing tomatoes from seeds is a rewarding process that lets you choose from a wide variety of heirloom and hybrid types. Here’s how to do it:
Step-by-Step Guide
1. Choose Your Seeds: Select a variety suited to your climate and intended use (e.g., cherry tomatoes for snacking, Roma for sauces).
2. Start Indoors: Sow seeds 6–8 weeks before the last frost in a seed tray filled with light, well-draining seed-starting mix. Find the last frost date from your USDA hardiness zone and simply count back in time 6-8 weeks to find the right time to start your seeds!
3. Planting Depth: Bury seeds ¼ inch deep, lightly cover with soil, and mist with water. You can also keep a cover over the seed tray to maintain even moisture levels.
4. Provide Warmth & Light: Keep the tray in a warm spot (70–80°F) or use a heat mat. Once sprouted, place under grow lights or near a sunny window for at least 12–16 hours daily.
5. Watering: Keep soil consistently moist but not soggy. Use a spray bottle or bottom-watering method to prevent disturbing delicate seedlings.
6. Transplanting: Once seedlings develop two sets of true leaves, move them into larger containers. Bury the stem deeper to encourage strong root growth.
7. Hardening Off: Before planting outdoors, gradually expose seedlings to outdoor conditions over 7–10 days to prevent transplant shock.
8. Outdoor Planting: Choose a sunny location with rich, well-draining soil. Space plants 18–24 inches apart and provide stakes or cages for support.
9. Care & Maintenance: Water deeply but infrequently, fertilize with balanced nutrients, and prune lower leaves to improve airflow.
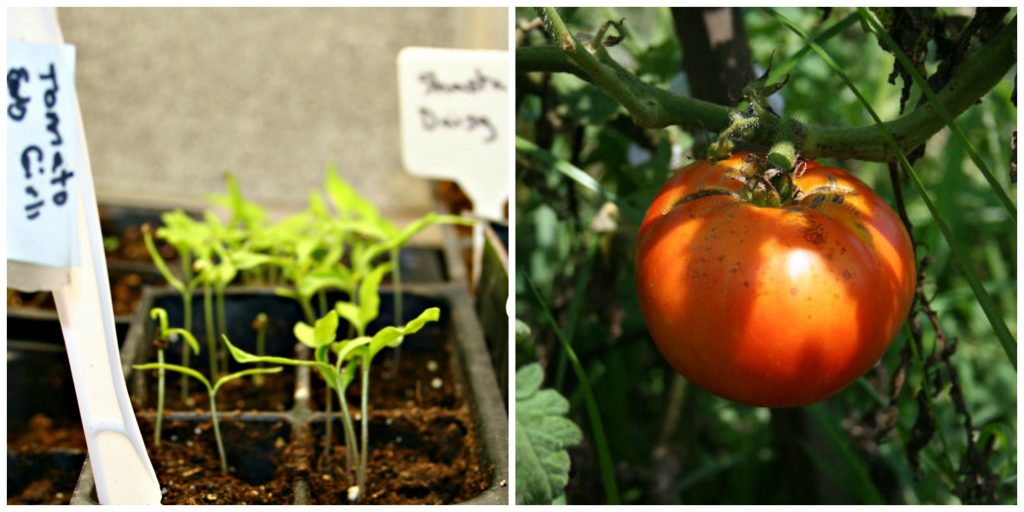
10. Harvesting: Depending on the variety, tomatoes will be ready 60–100 days after planting. Pick when fully colored and slightly firm.
How to Plant Tomato Seeds
Tomato seedlings need full, bright sunlight or artificial light to thrive. They need clean containers such as a seed tray or pot. Clean the container with a solution of 9 parts water to 1 part household bleach to prevent diseases such as dampening off from killing your seedlings. Mix the water and bleach solution in a tub or pail, soak the container for 10-20 minutes, then remove it and rinse it under plain water.
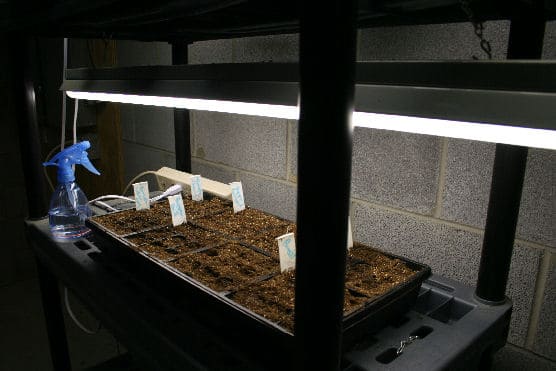
When growing tomatoes from seed, use a special seed starting mixture or a good bagged potting soil mix. Place it in the container. Take each seed out of the package and gently press it into the soil. The seeds should be about 1/4 of an inch below the soil level. Water them well and place the tray or pot under the lights. Keep the soil evenly moist until the seeds germinate, then water as necessary.
If you are growing a lot of seeds or varieties of tomatoes, label your pots and containers with the type of seedling and the variety name. Trust me on this, you won’t remember what you have planted. Label everything!
Keep your seedlings indoors until it is time to move them outside. Then gradually acclimate them to the outdoors. This is a process called hardening off. Bring the trays outside during the day and back inside at night. Do this for a week, then leave the trays continuously outdoors for a week. Make sure the seedlings are kept watered and be sure to take them back inside if there is any danger of a frost. After all your hard work of growing tomatoes from seeds, you don’t want to lose them to Jack Frost.
After two weeks of this TLC, your tomato seedlings should be ready to plant in the garden. When you plant tomatoes, there’s a little trick to get stronger, healthier roots. Peel off the bottom sets of leaves from your seedlings and plant the tomato stem well below the soil line. Tomatoes grow extra roots from their stems if the stems touch the soil and you will have a healthier, stronger root system.