
I stepped outside to snap some photos of the garden today, and while downloading my digital camera I realized that I had photos taken of the same area a little more than a year ago. I was shocked at the difference. See what only one year of gardening can do for an area? Look at the pictures below!
What a Difference A Year Can Make
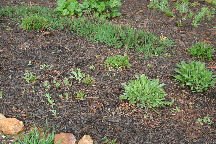
The top picture – the smaller one – shows the mess that currently exists in the perennial garden. I’ve got coreopsis babies coming up every which way. Gaillardia has self-seeded too. And I think my white and yellow daisies added to the cacophony – either that or I have the worst case of artemesia (weeds) ever. But what a glorious mess! Healthy, green, abundantly teeming with seedlings…this is living soil at its finest. Finally!
The top picture was snapped April 15, 2009:
My poor azalea is somewhere in the middle of this picture below, which shows the same area just a few feet away. Can you see how the coreopsis has just taken over? Argh. Heavy plant moving this weekend for sure! But think about it – the seeds fell and I did nothing, and look at how many plants sprang up in the garden.
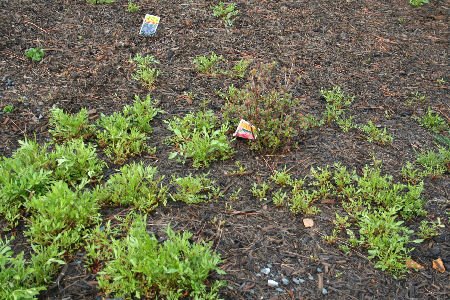
And this picture was taken a little more than a year ago, on May 15, 2008. The close up above (coreopsis photos) was taken on the far side of the trellis entrance, taken from the driveway looking back towards the woods. Look at the bare, clay soil, Doesn’t it look awful? I remember that we had to take a pick axe to the soil to plant the perennials!
And just for kicks – this is what the land looked like in 2006 – 2007, right after the bulldozers arrived and the area was cleared. This photo was taken from what is now the bottom of the slope of the perennial garden. If you were standing in my driveway, looking at the garden as in the picture above with the trellis, it’s the area far off to the right – only the picture was snapped looking up, with the photographer’s back to the woods.
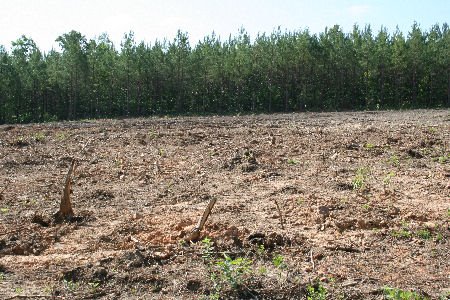
What a difference one year can make in a garden. As you can see from the bottom picture, the soil was hard clay. The land was originally planted in loblolly pine – the trees used to make paper. When we bought the property, we asked that three acres be cleared for the home and garden. What was left underneath was soil that was so devoid of life that when I took a sample into the nursery for a soil test, they actually called to ask where it had come from. They were amazed at how sterile the soil was – little organic matter, highly acidic (the pH was actually around 4 which is awful!) with poor drainage.
How did I make such progress in one year with the soil?
- As much compost, horse manure (contributed by a neighbor), and mulch as I could work into the soil
- Natural, organic fertilizers and soil boosters. The one I chose was from Gardens Alive. It works by adding special bacteria and enzymes to the soil to help the plants’ roots take up more nutrients. Also, because the water that runs off this garden ends up into my water well from which my drinking water is drawn, I cannot use ANY chemicals, chemical fertilizers, or creepy sprays here. All organic, all natural or nothing. Seems to have worked.
- Thick layer of pine bark mulch applied to the top. This broke down over the year and added even more organic matter to the soil. Yes, it was acidic, but it also kept moisture from evaporating.
This took some effort, but it’s mostly one-time effort. We’ll reapply the mulch this year, and spread a little compost, but that’s it.
I’ve already got flower buds on a lot of the perennials. Once I get this garden cleaned up and we get some blooms going, I’ll post more pictures.
Happy gardening!


I love before and after pictures. They give you motivation and inspiration when it is hard to remember where you’ve been with things. I like to look back and see how far I’ve come. You yard looks great!
Heather
Thanks Heather! I was astonished at the changes in just one year. They are indeed inspirational. We walked around the perennial garden yesterday and kept pointing to plants – “look how this has grown” – “that has buds!” “I think that one has babies!” It’s amazing how with the spring rains, everything just grows!
Enjoy your garden and have a beautiful day!
Jeanne