We planted four new trees in the orchard this weekend, including peach trees. I thought I’d share with you how to plant a peach tree in your own backyard. It doesn’t take long, although it does take some muscle!
How to Plant a Peach Tree
Peach trees can be self-pollinating or require a pollinator, so check the tags at the nursery and do your homework before purchasing the tree.
What does that mean, self-pollinator or require a pollinator? Some fruit trees contain the proper genetic material in both the pollen and the ovary to produce fruit. Pollen, drifting or carried from one flower to another on the same tree, completes the DNA and the result is a fruit. Other trees require a different variety to successfully bear fruit. Most apple trees are like this and rely on bees or other flying insects to bear pollen from compatible nearby varieties to fertilize their ovum and produce fruit.
Peach trees tend to be self-pollinating, but we wanted new varieties in our orchard. Last year, a young cub climbed our best Elberta peach and ate all the peaches just days before we were going to harvest! I looked down from my office windows and saw the tree swaying like it was windy outside, but only that particular peach tree swayed. My husband simultaneously yelled “BEAR!” and I saw the little black bear scamper down the trunk and run for the woods. We knew something had been eating the peaches at night, but he grew brazen and came out during the day for his sweet treat. Alas, we were left without peaches last year!
Time to get a new dog. The bears never bothered the fruit trees when my German shepherd was on patrol!
Freestone or Clingstone?
When we first planted our orchard, we chose Elberta peaches. These are clingstone peaches. Clingstone peaches tend to have hard flesh and the flesh ‘clings’ to the stone or pit in the center. Clingstone peaches are good for canning but not great for fresh eating. They never really soften on the tree and can be very hard to bite into.
We purchased three freestone peach trees from Lowes and planted these over the weekend. The new varieties are Contender, Belle of Georgia, and Red Haven.
We have had terrible luck with the plum trees in the orchard. They never produced plums, and two died. Instead of replanting plum trees, we decided to plant peach trees instead. We also chose to add another apple tree. Eventually, we’ll probably phase out everything except apple, peach, pear, and figs. The apricot trees may remain even though they don’t produce fruit because they are so pretty.
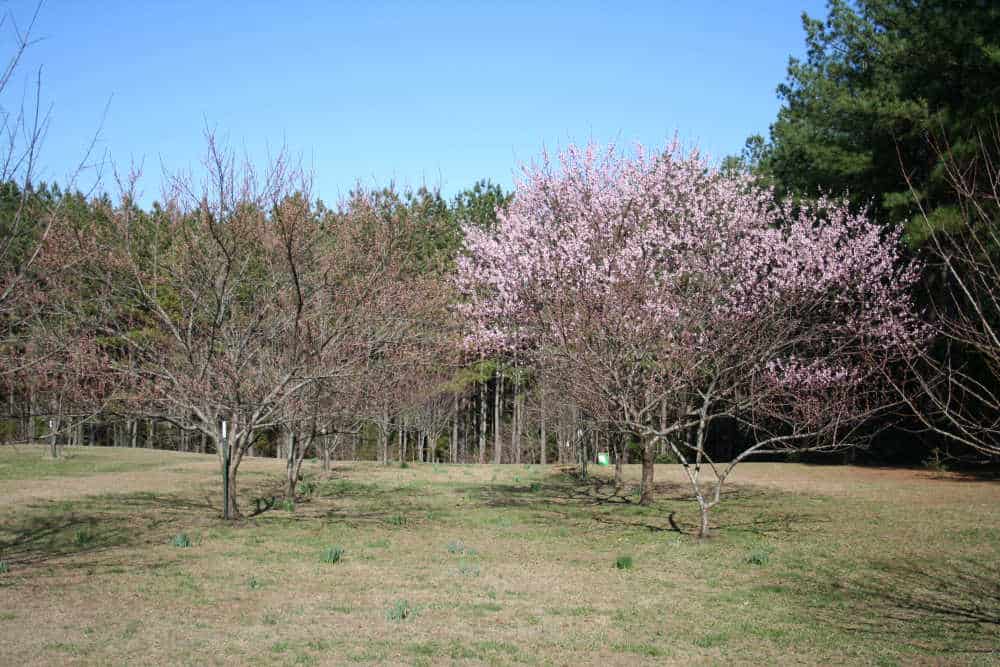
Here is the layout of our current orchard and some pictures of how it looked this weekend. It takes up about 1 acre, total. Underplanted among the trees are daffodils.
Planting a Peach Tree
First, be sure you aren’t digging in an area with underground wires or pipes. Contact your local utility company. Most have a free number to call to ensure you aren’t digging into something dangerous!
We’re on our own land and know that there are no wires or pipes in the area, so away we went. Unfortunately, we did encounter a thick vein of pink quartz rock under the soil. Our whole land has veins of quartz under it and while it is lovely it is very hard to dig through it.
- Find a place for your peach tree that receives full sunlight all day long. That means six or more hours of sun touching the leaves without any shade.
- Dig the hole slightly deeper than the pot the peach tree is currently in when you buy it from the nursery.
- Spread compost in the bottom of the hole.
- Turn the pot on its side and tap the sides to loosen the tree.
- Gently pull it from the pot. It’s better to have a helper tug on the pot while the stronger one tugs the tree.
- Place the tree in the hole and fill the soil. The peach tree should be planted as deeply as it was in the pot – don’t let the soil go up too high on the trunk.
- Walk gently around the area newly planted to push down the soil.
- Rake the soil loosely around the newly planted tree to smooth it out.
- Plant grass seed if you want grass growing around the tree.
- Water it very well.
- Water it daily for the first 2 weeks or until you get a good day of rain.
- The first year, if there’s a dry spell or a hot spell during the summer, water it more.
Should You Stake a Newly Planted Peach Tree?
We do stake our trees for the first year or two, but with this caveat: the ropes are softened by a buffer, and they are loose enough to allow the tree to sway in the wind. Some experts believe that staking trees, especially improper staking, does more harm than good. I tend to stake my trees if the trunk is crooked or if the tree starts to lean a bit, as ours do since the orchard is on a slope.